Recently, this question has been making the round on different sites on the internet like Reddit and StackOverflow.
The answer to the question is Yes!, it is possible in JavaScript.
You might have already seen the solution on different sites, I will try to explain the code to make you understand why it works.
const a = {
  i: 1,
  valueOf: function () {
    return a.i++;
  }
}

if(a == 1 && a == 2 && a == 3) {
  console.log('JavaScript Rocks!');
}
Why It Works?
There isn't any trick in this code. The solution is simply using the concept of loose equality using double equals(==) operator. If you need to understand the difference between double equals vs triple equals, please read my this article. JavaScript Triple Equals Operator vs Double Equals Operator ( === vs == )
If you have noticed, we compared two different types here in a == 1. Here a is an object which is compared to a number. Whenever we compare two different types with a double equal operator, type coercion happens. In type coercion, operator tries to convert both types to a similar type.
In this case, the object will be converted to primitive(number) type by calling the function valueOf if it is available.
valueOf is a builtin function in JavaScript to convert an object to a primitive type, if no primitive value available in the object, valueOf returns the object itself. If valueOf fails then toString is used to convert an object to a string. In toString case, the number on the right-hand side will also be converted to a string for comparison using loose equality(==) operator.
The cool thing is that these methods valueOf and toString can be overwritten.
a.valueOf = function() {
  return 'magic will happen here!';
}
Here we have overwritten the native implementation of the valueOf function with our own. As we know while doing a comparison with double equals operator, it coerces the object type to a primitive type by invoking the valueOf function of the object type.
The Magic Spell
To evaluate (a ==1 && a== 2 && a==3) this statement to true, we need to increment the value of a systematically. To achieve this we have overwritten the valueOf the object as:
valueOf: function () {
    return a.i++;
  }
We have initialized the i with 1 and then incremented it using ++ operator after each use. So our expression (a ==1 && a== 2 && a==3) will be break into following steps:
While comparing a == 1; valueOf functionof the object will return current value of i(which is 1) and after returning the value will increment it to 2
While comparinga == 2;valueOf function of the object will return current value of i(which is now 2) and after returning the value will increment it to 3
While comparing a == 3; valueOf function of the object will return current value of i(which is now 3) and after returning the value will be incremented to 4
That is the reason our expression evaluates to true.
Hope this article helped you to understand it. If you have any question please post it in comments.
Initially, JavaScript language was introduced for the client side programming, later with the Node.js progress it started to become an emerging server-side programming language too. As you might know when you start developing an application with JavaScript and as its code starts to grow, at some points it gets complex and difficult to maintain.
Since JavaScript does not support the features like strong type checking, concepts of object-oriented programming and compile time error checks which make it a difficult language to code with. Also, these problems limit JavaScript usage for enterprise level applications development. TypeScript is developed to overcome these issues and make a reliable and better experience of coding with JavaScript. TypeScript is a promising change and will likely to make JavaScript much famous.
What is TypeScript?
Definition of TypeScript on its official site.
As stated in the definition of the official site, the TypeScript is strongly typed superset of JavaScript that generates the JavaScript, which means that TypeScript is JavaScript moreover it has some additional helpful features. TypeScript is a transpiler which generates the plain JavaScript, so at any point, if you are not comfortable with TypeScript syntax, you can start writing a JavaScript syntax code & it will work perfectly with TypeScript code.
TypeScript helps to code in structural programming style, using classes, interfaces, strong typing, modules and also it easily integrates with other popular JavaScript libraries. TypeScript is kind of wrapper on JavaScript that has extra features to help the developer.
TypeScript is developed by Microsoft and also it has been used to develop the Angular 2, which is also the reason that TypeScript gained so much attention recently. Having the support of two big tech communities means that there is a lot more to come in future and surely it is going to be a more stable tool.
Why TypeScript?
TypeScript is just a superset of JavaScript, it does not have any effect on the final output. So it is completely on you to use TypeScript or not. The reasons to use TypeScript is its great tools which help in larger projects where your code-base is larger, TypeScript helps to manage the code base.
Development Friendly Tools
As discussed earlier, with larger size projects JavaScript code gets messier and difficult to manage and if the code is not properly structured it gets nightmare to work on. Once project size gets bigger making refactoring or any kind of changes to existing code is very scary or kind of next to impossible task. TypeScript has some great tools to manage the larger code base, like navigation, IntelliSense, and easy refactoring. These are the tools that required for a large project.
With these great tools, any changes or refactoring in existing codes is less risky and time savings. The extensions like Resharper helps in utilizing these tools very effectively.
Object Oriented Programming flavor
With TypeScript you can achieve object oriented flavor in JavaScript, it allows you to create an interface, classes, implement inheritance. These are the concepts any developer having experience in OOP language can understand. Let's take an example that you are working on an application in which you have an object of User with different roles (i.e, Admin, EndUser etc), which has some basic user properties. Now if you are working on plain JS, you cannot restrict the definition of User object i.e, its properties and functions. That is the reason you might have different versions of the User object in different methods.
While using TypeScript you can define an interface for User objects and all roles will implement this interface so that we can make sure that object contains the required mandatory properties.
An important point here is that TypeScript gives these flavors of Object Oriented programming but not force it and as already discussed any valid js code is valid TypeScript code so a developer might start developing on concrete objects instead of these abstract implementation without any warning.
Readable and Easy to understandable Code
TypeScript adds details to the signature of function which makes it easy to understand. Let's take an example of jQuery ajax function, how descriptive it is?
jQuery.ajax(url, settings);
What information you can get from this line of code? It is a function which takes two arguments, what are those two arguments types? Is URL an object? what are settings object contains? its declaration has not clear information. To find the answers to above concerns you will require to see its source code or the jQuery documentation which is the overhead.
Let see the strong type declaration of the same function:
Let see what this function is telling us, it says ajax is a function which can take two arguments, URL which is a string and AjaxSettings is an optional argument, which is an interface and can only contain the properties of specific type, allowed by the interface definition also declaration tells us that this function will return XHRObject.
Migrating Existing Code
If you have existing written code you can easily migrate your js code to TypeScript code without much effort. Since TypeScript is just a superset of JavaScript and any valid JS code is a valid TypeScript code. So you can convert any existing .js file to .ts (TypeScript file extension). After switching file extension you can start changing dynamic types of your code to strongly typed. Once your are done with one module you can pick next module and your code is any time ready and functional whether its completely migrated to TypeScript or not.
Facade design pattern is a structural design pattern. Word facade means 'a deceptive outward appearance'. As facade design pattern hides all the complexities of one or many sub-systems and provides a clean, easy to use facade interface.
We can create multiple Facade interfaces by grouping relevant sub-system in particular class. The client will communicate these facades instead of complex individual subsystems.
Facade Design Pattern - Class Diagram
Implementation
Let's implement a facade pattern on an e-commerce site. We are going to create an online shopping system in which user selects an item from a catalog and place an order. Let's see its code
public class Inventory
{
    public bool IsItemAvailable(String itemId)
    {
       return "Item details";
    }
}

public class Payment
{
    public String Pay(String itemId,Paypal paypal)
    {
       return "Charge for items";
    }
}

public class Shipping
{
    public String ShipOrder(String itemId,Address shipmentAddress)
    {
       return "Ship items to address";
    }
}

public class OrderFacade
{
    // composed of all Order related sub-systems
    Payment _Payment;
    Inventory _Inventory;
    Inventory _Shipping;

    public void OrderFacade()
    {
        _Payment = new Payment();
        _Inventory = new Inventory();
        _Shipping = new Shipping();
    }

    public void PlaceOrder(String itemId,string creditCard,string shipmentAddress)
    {
      // check if item is available
      if(!_Inventory.IsItemAvailable(itemId)) return "Item Not Available";
      // charge for item price
      _Payment.Pay(itemId, new Paypal(creditCard));
      // ship order to customer
      _Shipping.ShipOrder(itemId,shipmentAddress)
    }
}

public class Client
{
    public static void main()
    {
       OrderFacade orderFacade = new OrderFacade();
       orderFacade.PlaceOrder("1234", "321546", "23-B Frim Road, Moscow");
    }
}
As you have seen OrderFacade has encapsulated all the order-related activities and now client just has single point to communicate instead of invoking each sub-system individually. OrderFacade will delegate relevant sub-system and will complete the client request.
Facade pattern provides an interface which is easy to use for a client by hiding many interfaces. This pattern is actually straightforward but it is quite powerful. It allows us to make our system loosely coupled. There is a design principle Least Knowledge which guide us to have fewer dependencies between objects which mean objects should not be tightly coupled otherwise it would be difficult to manage.
Using Facade pattern as we know we have an interface which is responsible for communicating between the objects so it actually allows us to have fewer dependencies within objects. It has many advantages for instance in our example of online shopping system if our payment system is completely independent we can easily change it anytime without affecting the client.
Conclusion
Facade design pattern is a structural pattern which makes design easy by allowing to make a system less tightly coupled and provide an interface to the client which is clean and easy to use by hiding all complexities of sub-systems.
Adapter pattern works as a bridge between two separate objects. It converts interface of a class into another interface which is required. Adapter pattern lets different classes work together that could not otherwise due to the different interface of each class.
Understanding Adapter pattern is not that difficult because it works same as we see an adapter in the real world. The simplest example is AC power adapter which we use for cell-phone, laptop chargers. Electricity at home socket is 220 volts (or 110 volts) but our cell phone needs 5-12 volts so we need an adapter which should convert the power to required range.
Adapter in Programming
Let's see a real world example for Adapter pattern. Information sharing system's team is working on a system which uses social networks sites to share the content. The team has designed an interface which is implemented by Facebook, Twitter, and Linkedin classes. The system is using this interface to switch between these sites and share the content. Developers have to spend a lot of time in implementing these network site's public APIs in these classes and make system bug free and tested.
Here is code implementation of the system.
public interface ISocialNetworks
{
    bool Login(string username, string password);
    bool Share(string content);
}

public class Facebook: ISocialNetworks
{
    public bool Login(string username, string password)
    {
       //Login Using Facebook API
    }

    public bool Share(string content)
    {
       //Share Using Facebook API
    }
}

public class Twitter: ISocialNetworks
{
    public bool Login(string username, string password)
    {
       //Login Using Twitter API
    }

    public bool Share(string content)
    {
       //Share Using Twitter API
    }
}

//similarly for Linkedin
Everything was working fine until client wanted Google+ also in the list and team know to implement the same interface you have to understand APIs and have to put a huge effort in implementations. But you found that Google+ has already developed a library so you downloaded that library and try to integrate into your system.
There is a little problem Google+ developers have implemented their own interface which is not compatible with our information sharing system. Here is the code:
public interface IGoogleSocialNetworks
{
    bool Authenticate(string username, string password);
    bool Post(string content);
}

public class GooglePlus: IGoogleSocialNetworks
{
    public bool Authenticate(string username, string password)
    {
       //Login Using Google API
    }

    public bool Post(string content)
    {
       //Share Using Google API
    }
}
Now here comes the adapter which will convert interface of Google+ library to the interface of desired system interface i.e, ISocialNetworks. Let's see its code implementation
public class GoogleNetworksAdapter: ISocialNetworks
{
    GooglePlus GoogleLibrary;

    public void GoogleNetworksAdapter (GooglePlus googleLibrary)
    {
       this.GoogleLibrary = googleLibrary;
    }

    public bool Login(string username, string password)
    {
       GoogleLibrary.Authenticate(username, password);
    }

    public bool Share(string content)
    {
       GoogleLibrary.Post(content);
    }
}
Let see design diagram after implementing adapter pattern
Now since Google+ adapter has the same interface as our other Social Networks i.e, ISocialNetworks so it can be use in system easily. Here is how client uses the adapter:
Client make a request to Adapter class (GoogleAdapter) for a method of target interface (ISocialNetworks) e.g, Login
Adapter class translate that request to adapted object method (IGoogleSocialNetwoks) e,g, Authenticate and return response
Client receive the response without realizing that Adapter converted its request to another form.
Here is the class diagram of Adapter Pattern
Adapter pattern uses other good practices of Object Oriented for example object composition in Adapter class to wrap adapted functionalities in target interface. Another advantage of using this object composition is that this adapter can be used with any child class that inherits this Adapted class.
Special Scenario
We have seen a simple example in which all the methods of target interface were available in adapted class. What if there is a method in target interface which is not available in adapted class? In that case adapter pattern is not perfect to use because we have to throw a NotImplementedException. So the client will have to watch out for possible exceptions from the adapter class. The Adapter class should be well documented to reduce the chance of leaving unhandled exception at the client end.
Decorator Pattern is a design Pattern that allows to dynamically add behavior to an existing individual object without making any code changes to the underlying classes. It is a flexible replacement to sub-classing for extending functionality to an object.
If you think inheritance is everything than decorator pattern helps you to learn the power of extension at run-time instead of compile-time. Let's try to learn and implement decorator pattern on a problem.
Decorator Pattern in Pizza Corner Problem
Pizza Corner growing restaurant chain around. Because they have grown, they’re trying to update their ordering systems to match their Pizza offerings. While starting their business they created their classes like this.
Pizza Corner order system's classes design
Other than regular Pizza, you can ask for several pizza topping options like Bacon, Black olives, Chicken, Extra cheese, Mushrooms, Onions, Sausage and much more. Pizza Corner charges for each of these topping, so they want to add these into their system.
First Implementation
First implementation of adding new abilities in system team created a child class for each pizza with each topping option. So first implementation looks like.
If your first thought was also to use inheritance for this problem then you are incorrect. What if Pizza Corner started offering more toppings or added new pizza type you have to add all combination of classes in a system which will become hard to manage.
Alternate Solution
Developer team realize that this subclassed solution is not going to work and its actually a bad design so they started redesigning the system. Now they created instance variables for each topping option in the base class. So each child class can set options which it required.
This solution reduced the size of classes but there is another problem if you have noticed now all the classes has all the topping options so Vegie can also have chicken topping which should not be allowed. Additionally, this design also violate the basic design principle of "Classes should be open for an extension, but closed for modification." As whenever a new topping option will be introduced we need to modify our base class which is not correct.
Decorator Pattern
As we have seen different approaches for our problem at Pizza Corner which have not work out very well. Let's implement Decorator Pattern in this problem.
For decorator pattern we take our pizza type object and than decorate it with different toppings. Lets say we got an order for BBQChicken with Onions, ExtraCheese and Mushrooms.
First take a BBQChicken object
Decorate it with Onions
Decorate it with ExtraCheese
Decorate it with Mushrooms
Call the cost() method and delegation will add cost of all topping and pizza
Decorator Pattern - Decorating Objects
Here are some key points for decorator pattern implementations:
Decorators object should have the same base type as the objects they are decorating.
We can use more than one decorators to wrap an object.
Given that the decorator has the same supertype as the object it decorates, we can pass around a decorated object in place of the original (wrapped) object.
The decorator object apply its own behavior either after or/and before delegating to the object it decorates.
We can decorate objects dynamically at runtime with as many decorator as we required.
Code Implementation
Here is a diagram which shows the design of decorator pattern. We have to implement this design for our system. I am going to implement it in C# language.
Decorator Pattern - Image from Head First Design Pattern
Our base class of Pizza which will be inherited by all pizza types and toppings.
public abstract class Pizza
{
  String description = “Unknown Pizza”;
  public String getDescription()
  {
    return description;
  }

  public abstract double cost();
}
Here are our concrete components classes for each pizza type. Each concrete components will set is own definition for cost method and set description.
public class BBQChicken : Pizza
{
  public BBQChicken()
  {
    description = “BBQ Chicken”;
  }
  public double cost()
  {
    return 800; //rupees
  }
}

public class HotChickenWings: Pizza
{
  public HotChickenWings ()
  {
    description = “Hot Chicken Wings”;
  }
  public double cost()
  {
    return 750; //rupees
  }
}
public class Vegie : Pizza
{
  public Vegie()
  {
    description = “Vegetable Pizza”;
  }
  public double cost()
  {
    return 650; //rupees
  }
}
Let implement topping decorator abstract class:
public abstract class ToppingDecorator : Pizza
{
  public abstract String getDescription();
}
We have implemented our base topping decorator class, lets implement decorator class.
public class Onions : ToppingDecorator // ToppingDecorator inherit Pizza
{
  Pizza pizza;
  public Onions(Pizza pizza)
  {
    this.pizza = pizza;
  }
  public String getDescription()
  {
    return pizza.getDescription() + “, Onions”;
  }
  public double cost()
  {
    return 120 + pizza.cost();
  }
}
public class ExtraCheese : ToppingDecorator // ToppingDecorator inherit Pizza
{
  Pizza pizza;
  public ExtraCheese(Pizza pizza)
  {
    this.pizza = pizza;
  }
  public String getDescription()
  {
    return pizza.getDescription() + “, ExtraCheese”;
  }
  public double cost()
  {
    return 160 + pizza.cost();
  }
}
// similarly implement all toppings
Serve Some Pizzas
As we have implemented decorator pattern for Pizza Corner lets serve some order of pizza and see how its going to work.
public class PizzaCorner
{
  public static void Main(String[] args)
  {

    Pizza pizza = new HotChickenWings();
    System.Console.WriteLine(pizza.getDescription() + “ Rs.” +pizza.cost());

    Pizza pizza2 = new BBQChicken();
    pizza2 = new Onions(pizza2);
    pizza2 = new ExtraCheese(pizza2);
    pizza2= new Mushrooms(pizza2);
    // cost triggering order is Mushrooms, ExtraCheese, Onions, BBQChicken
    System.Console.WriteLine(pizza2.getDescription()+ “ Rs” +pizza2.cost());
  }
}
Decorator Pattern in JavaScript
Let's implement the decorator pattern in JavaScript. Let's say a Cell Phone company implementing their system. They create Cell Phone with different features e.g, Camera, Wifi, 3G, Bluetooth etc each of these features has some cost. They want to implement their system in a way they don't need to change the whole system when they introduce a new phone model with some feature. Here we going to use decorator pattern in which we take base Cell Phone object and decorate it with Feature decorator.
//object we're going to decorate
function CellPhone() {
    this.cost = function () { return 397; };
    this.screenSize = function () { return 5; };
}
/*Decorator 1*/
function Camera(cellPhone) {
    var price = cellPhone.cost();
    cellPhone.cost = function() {
        return price + 45;
    }
}
 /*Decorator 2*/
function Wifi(cellPhone){
   //get cell phone current price
   var price = cellPhone.cost();

   //update cell phone cost() function
   //and add feature price to current price
   cellPhone.cost = function(){
     return  price + 90;
  };
}

 /*Decorator 3*/
function threeG(cellPhone){
   var price = cellPhone.cost();
   cellPhone.cost = function(){
     return  price + 90;
  };
}

/*Decorator 4*/
function Bluetooth(cellPhone){
   var price = cellPhone.cost();
   cellPhone.cost = function(){
     return  price + 50;
  };
}
Company introduced a new model with Camera, Wifi and bluetooth. Lets see how to decorate the object:
var newModelCellPhone = new CellPhone();
Camera(newModelCellPhone);
Wifi(newModelCellPhone);
Bluetooth(newModelCellPhone);
console.log(newModelCellPhone.cost());
console.log(newModelCellPhone.screenSize());
Conclusion
We have implemented Decorator Design Pattern which add behavior to an existing object without making any code changes to the underlying classes as you notice its follow the design principle of "Open for an extension, closed for the modification" Now if Pizza Corner add any new Topping serving the need to extend the system by implementing new decorator class and no need to existing system. If you have any question or feedback please post in comments.
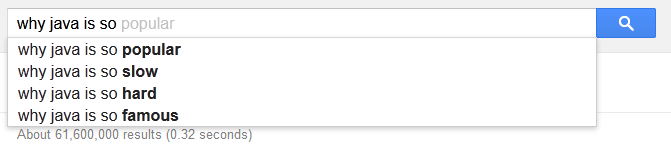
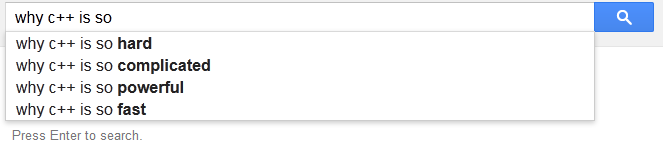
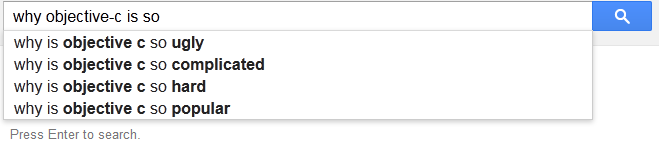
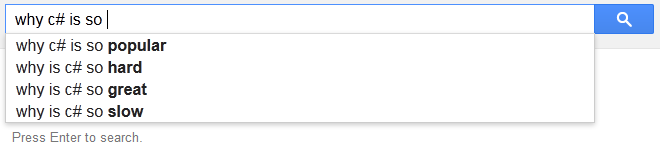
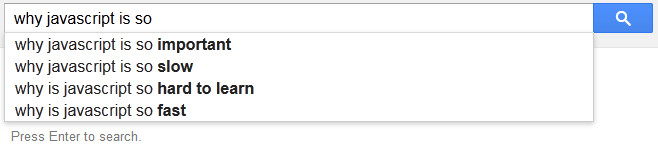
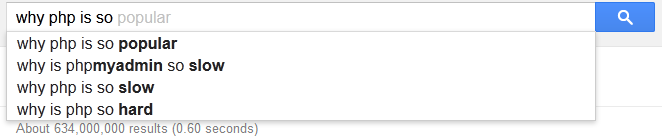
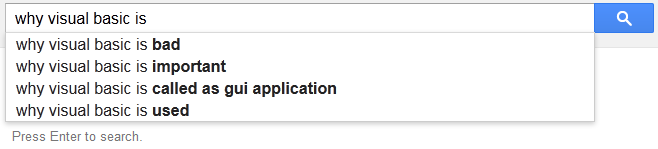
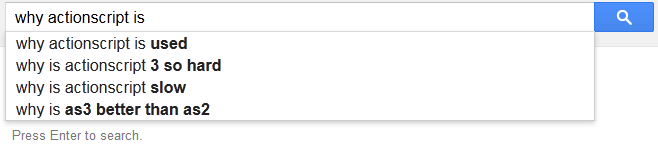
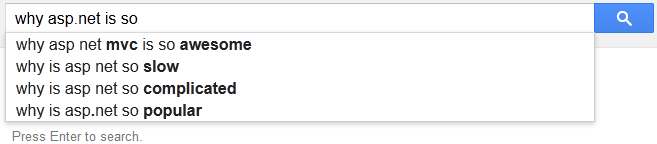
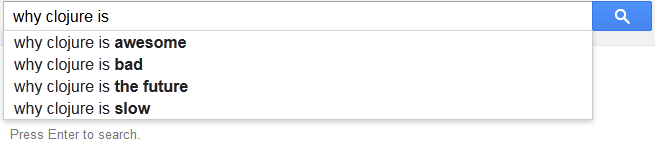
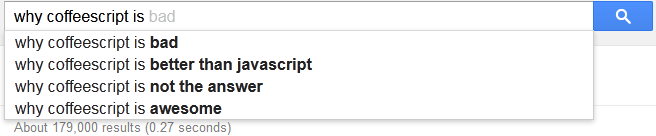
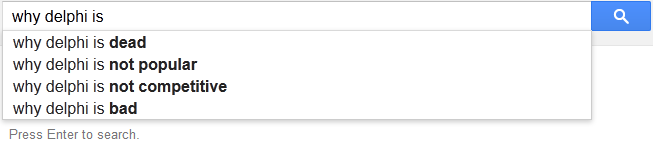
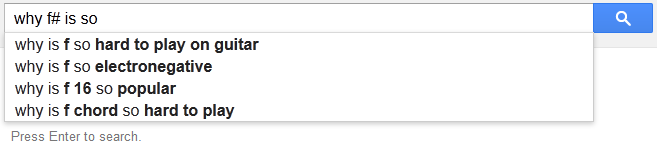
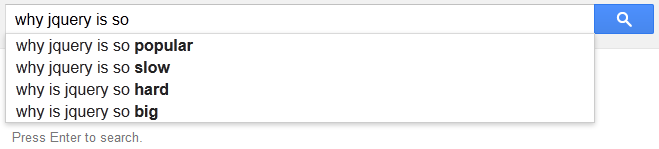
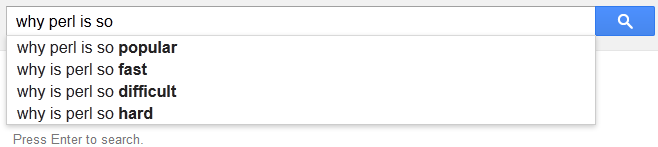
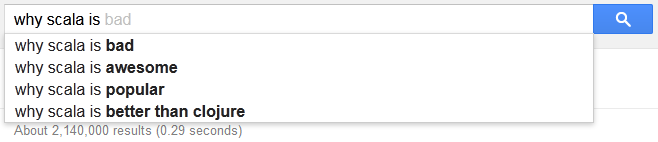
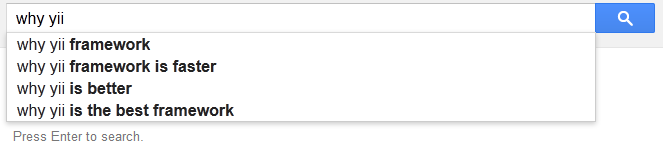
Google autocomplete suggestion give you popular searches for your typed word. Here I search about different programming languages and frameworks. See what Google suggested me.
Some suggestion are really nice but some are.... see.
In programming, a design pattern is a general solution to a commonly occurring problem you find again and again in software design. A design pattern is a template for solving a problem and it can be use in different situations.
Singleton Pattern
Singleton Pattern is the most known design pattern and it is the simplest in terms of class diagram. It contains only one class. Singleton is a class which can be instantiate only one time and same instance get utilize in complete application. Singleton class don't take any parameters while creating an instance then same object might not be usable if different parameters are passed to initialized the class. The singleton pattern gives global point of access to instance like global variable but we can create our object only when its needed.
When to use Singleton?
There are many objects in an application for which we need a same instance always for example: logging objects, caches, dialog boxes, thread pools, app-settings or registry settings objects and object handle devices like printer etc. In fact many of these objects may cause unexpected application behavior or cause overuse of resources if more than one instance get instantiate.
Is Singleton really an anti pattern?
Before going to actual implementation of Singleton pattern, there are some pitfalls with singleton pattern. It is really complex and difficult to write unit test for a singleton class. Because singleton object maintain the state so your multiple test cases can behave weird if you did not reset the global state of singleton class between two isolated test cases. The ideal way is to use IoC/DI container (i.e, spring etc). These containers allow you to create singleton instance but also give you the ways to modify this behavior according to situation like for unit tests.
Implementation of Singleton Pattern
Any public class can be instantiate as new Object() but if class is public then at any point new Object() will instantiate a new object of the class.
So that means if class is public we cannot stop the multiple instances of the class. What if we make the class private?Will this stop the multiple instances of class?NO, as private class often declared as nested class and can be accessible within parent class but there can be multiple instance of private class within parent public class. So making class private will not make it singleton.
What if we make the constructor of class private?
public Singleton
{
  private Singleton()
  {
  }
}
What does this code means? It cannot be instantiate as its constructor is private and can only be called within the class. So now we have a class which cannot be instantiate but for Singleton we need ONE OBJECT which is not possible in our code.
As we know private constructor can only be invoke within the class that means we actually can instantiate within the class. so what if we create a static method which returns us an object.
public Singleton
{
  private Singleton()
  {
  }

  public static Singleton GetSingletonInstance()
  {
     return new Singleton();
  }
}
Now we can get class instance using static function Singleton.GetSingletonInstance(); It is still returning new instance each time but now we can easily change the code to return the same instance:
public Singleton
{
  //private static variable to hold the instance
  private static Singleton _uniqueInstance = null;

  //private constructor can only be call within class
  private Singleton(){}

  //static function to get same instance always
  public static Singleton GetSingletonInstance()
  {
    if(_uniqueInstance == null)
    {
      _uniqueInstance = new Singleton();
    }
    return _uniqueInstance ;
  }

  //other required class methods
}
So now our code will check the static instance holder variable and if it is null which means it is not loaded before it will get initialize and will be return and for each next call same instance will be return.
So are we done with singleton? What if application has multiple threads? and two of threads at the same time called the Singleton.GetSingletonInstance();
Thread 1 will check if(_uniqueInstance == null) which will be true
Thread 2 will check if(_uniqueInstance == null) which will be true
So now we have two different instance of our Singleton object within two threads. So it is still not singleton object. Our above implementation is not thread safe.
In c# we can use lock to make it thread safe. Lock will make sure only one thread at a time can have access to instance initiator code.
public Singleton
{
  //private static variable to hold the instance
  private static Singleton _uniqueInstance = null;

  private static readonly object lockObject = new object();

  //private constructor can only be call within class
  private Singleton(){}

  //static function to get same instance always
  public static Singleton GetSingletonInstance()
  {
     lock(lockObject)
     {
       if(_uniqueInstance == null)
       {
         _uniqueInstance = new Singleton();
       }
       return _uniqueInstance ;
     }
  }

  //other required class methods
}
This implementation is thread safe as lock statement will make sure only one thread can use the code after locking it. Which means when thread 1 will invoke the lock() the second thread will be hang to use the code until thread 1 is completed with its executions.
As we can see it is thread safe but it will effect on performance as each time instance get requested lock will be created. But we actually need the lock for only first time when instance get initialized after that if multiple thread go for getting the instance at the same time will get the same instance as if(_uniqueInstance == null) will be false always.
How to optimize the performance?
If you think lock within GetSingletonInstance() will not cost you much, so there is no need to change in implementation. You are good with above code implementations. Otherwise you can do one of following options.
Without lock - Removing lazy instance creation
One option is to remove the lazy instance creation, instead we go with eager created instance.
public Singleton
{
  //private static variable with initialize instance
  private static Singleton _uniqueInstance = new Singleton();

  //private constructor can only be call within class
  private Singleton(){}

  //static function to get same instance always
  public static Singleton GetSingletonInstance()
  {
    //as we already initialize the static instance so just return it
     return _uniqueInstance;
  }

  //other required class methods
}
So now our static variable has the instance and it will be return for each thread. It is thread safe but it has removed the concept of on demand object creations which means your instance will be created whether your application need it or not.
Double checked locking
With double checked locking we firstly check whether instance is null or not.If it is null then we lock the inner-code. It means only first instance creation will require the lock after that all thread will get the same instance without lock.
public Singleton
{
  //private static variable to hold the instance
  private static Singleton _uniqueInstance = null;

  private static readonly object lockObject = new object();

  //private constructor can only be call within class
  private Singleton(){}

  //static function to get same instance always
  public static Singleton GetSingletonInstance()
  {
     if(_uniqueInstance == null)
     {
       //if _uniqueInstance is null then lock
       lock(lockObject)
       {
          //recheck here bcos if second thread is in queue it will get it false
          if(_uniqueInstance == null)
          {
             _uniqueInstance = new Singleton();
          }
       }
     }
     return _uniqueInstance ;
  }

  //other required class methods
}
So now if two thread gets if(_uniqueInstance == null)true only one thread will go forward to create the instance, second will wait for first thread to complete the execution.
Conclusion
As we noticed there are multiple ways to implement the singleton pattern and it is completely on the situation to opt the most suited option for the scenario. Each implementation has its pros and cons, so always go according to application situation.
Besides the fact, AngularJs is Single Page Application, but we use URL routes for bookmarks and for better user experience. An application navigates around the different UI views for different features and actions. Since AngularJs is doesA it do not reload the complete page on each route change but it loads only the HTML for the current page and inject into our current page.
In AngularJs application if you want to redirect the application to another page of the application, and if your navigation element is an anchor tag then you can simply assign new route's URL to href attribute of the tag.
But if your element to navigate is not anchor tag then you need to write a scope function which redirects to your required page and you invoke this function on your element click.
Drafts
and define that function in controller as:
$scope.redirectToDraftPage= function () {
   $location.path('/draft');
};
As you can see it is really annoying to write a scope function for each navigator items. So best way to achieve redirection in AngularJs on element click is to write a directive for this.
Directives
Directives are the custom tags and attributes, it is a way to extend HTML functionality. You can teach HTML new features using directive tags. AngularJs have many directives like ng-show, ng-app, ng-repeat, ng-class, ng-hide and many more.
Directives are HTML tags and attributes. These are the way to use AngularJS extended HTML functionality. Using directives you can teach HTML new features by writing your own custom directives. AngularJS comes with a bunch of built-in directives like ng-app, ng-hide,ng-show, ng-repeat, ng-class and many others.
Include a directive to your application, with restrict: 'A' defining that this directive is actually an extending Attribute, so whenever an element has this custom directive as attribute my defined functionality will be executed accordingly.
So what this directive will do? It will assign a click event to that particular element which has this attribute. And it will redirect to the provided route onclick of the element.
(function(){

    'use strict';

    function ngRedirectTo($window) {
        return {
            restrict: 'A',
            link: function(scope, element, attributes) {
                element.bind('click', function (event) {
                    //assign ng-Redirect-To attribute value to location
                    $window.location.href = attributes.ngRedirectTo;
                });
            }
        };
    }
    angular.module('app').directive('ngRedirectTo', ngRedirectTo);
    //inject $window service for redirection
    redirectTo.$inject = ['$window'];
}());
As naming convention for directive work as each camel-case word separated by hyphen( ie, - ). so our directive ngRedirectTo will be use in html as ng-Redirect-To. Here is the html:
Dashboard
So now you include this directive to your index page and you can reuse this in your whole application wherever you want to navigate. Just add this attribute to the element and assign the route to it.
If you have any feedback or suggestions or you want to add something to this article please post in comments.
Every AngularJs application communicates with remote server by making http calls and get the data in form of JSON or XML from remote server and than this data will be show to users with html.
If your application need to interact with the remote HTTP server then AngularJs has $http service for you. It allows to communicate with backend remote web APIs using JSON or XMLHttpRequest.
Here is the general get call using $http service:
// Simple GET request example
$http.get('/api/url').
success(function(data, status, headers, config) {
// asynchronous callback event will be trigger
// when the call to URL is successful.
}).
error(function(data, status, headers, config) {
// asynchronous callback event will be trigger
// when en error occurred calling URL or server returns
// response with error status.
});
post call using $http service:
// Simple POST request example
$http.post('/api/url', {data:'hello! Its post call data!'}).
success(function(data, status, headers, config) {
// asynchronous callback event will be trigger
// when the call to URL is successful.
}).
error(function(data, status, headers, config) {
// asynchronous callback event will be trigger
// when en error occurred calling URL or server returns
// response with error status.
});
There are many scenarios when you need to capture and make some changes to each request for example you want to insert session token to each web request for the authorization similarly you may need to capture each response to perform some actions on data like global error handling for API calls Interceptors are created for these scenarios.
Interceptors
$httpProvider contains an array of registered interceptors. Interceptor is an AngularJs factory, you can register it by pushing to httpProvider interceptor array in your application configurations.
There are four different interceptors you can handle, and these four functions should be in your interceptor factory if you need to perform custom operations in it:
Request Interceptor:
A request interceptor will be invoke on each request initialization, you can change request data here like adding authorization token.
Response Interceptor:
A response interceptor will be invoke on each response from remote server, you can manipulate response here like checking pushing some data to response perform some operations on response values.
Request Error Interceptor:
A request error interceptor will be invoke if there is some error while requesting remote server, like missing header or internet disconnection. Here you can validate request and resend the request to remote server.
Response Error Interceptor:
A response error interceptor will be invoke if there is error on backend remote calls like some unhandled exception on server. Here you can handle the request by showing proper message to user or resend the request to same url or alternate if available.
Here is the example of Interceptor factory with all above interceptor functions:
// Interceptor example for angularJs.
angular.module('app').factory('customInterceptor', ['$q', function($q) {

var myInterceptor = {
request : request,
requestError : requestError,
response : response,
responseError : responseError
};

// On request success
request: function (config) {
   // Contains the data about the request before it is sent.
   console.log(config);

  // Return the config or wrap it in a promise if blank.
  return config || $q.when(config);
};

// On request failure
requestError: function (rejection) {
  // Contains the data about the error on the request.
  console.log(rejection);

// Return the promise rejection.
return $q.reject(rejection);
};

// On response success
response: function (response) {
  // Contains the data from the response.
  console.log(response);

// Return the response or promise.
return response || $q.when(response);
};

// On response failture
responseError: function (rejection) {
  // Contains the data about the error.
  console.log(rejection);

// Return the promise rejection.
return $q.reject(rejection);
};

return myInterceptor;
}]);
and then register it to $httpProvider interceptor array.
If you are using token based authentication for web APIs in which on authentication call server return you a token & this token is required for all the further calls so server. So now you need to provide this authentication token to all the request so here we can use the interceptor. For this we need request interceptor and need to insert token to request.
Now register it to interceptors by pushing it to $httpProvider interceptor array. After this each call will be intercepted and authToken get injected to header. It is global handling for authentication now no need to handle it for individual call.
Overlay/Pre-loader to show
You want to show overlay on your page unless all the calls gets completed. For this instead of handling it manually you can write it in interceptors and let this work for your complete application.
To achieve this you can write html on your main index page for loader:
and html:
Now write the interceptor factory, which will show the loader when call get started and hide when all the calls get executed.But As you know there are multiple calls on a page so we will use a counter which will be incremented on each request and loader will be hide when request counter is zero:
// Interceptor example for angularJs.
angular.module('app').factory('overlay', ['$q', function($q) {

  //initialize counter
  var requestCounter=0;

  var myInterceptor = {
     request : request,
     requestError : requestError,
     response : response,
     responseError : responseError
  };

   // On request success
   request: function (config) {

    //will be incremented on each request
    requestCounter++;

    //show loader if not visible already
    if(!$('#preloader').is(':visible')){
        $('#preloader').show();
    }

    // Return the config or wrap it in a promise if blank.
    //it is required to return else call will not work
    return config || $q.when(config);
  };

  // On request failure
  requestError: function (rejection) {

     //decrement counter as request is failed
     requestCounter--;
     hideLoaderIfNoCall();

     // Return the promise rejection.
     return $q.reject(rejection);
  };

  // On response success
  response: function (response) {

     //decrement counter as request is failed
     requestCounter--;
     hideLoaderIfNoCall();

     // Return the response or promise.
     return response || $q.when(response);
  };

  // On response failture
  responseError: function (rejection) {


     //decrement counter as request is failed
     requestCounter--;
     hideLoaderIfNoCall();

     // Return the promise rejection.
     return $q.reject(rejection);
  };

  function hideLoaderIfNoCall(){
     // check if counter is zero means
     // no request is in process

     // use triple equals see why http://goo.gl/2K4oTX
     if(requestCounter === 0)
        $('#preloader').hide();
     }

  return myInterceptor;
}]);
Summary
In this article we have seen what interceptors are, try to explain different kinds of interceptor functions and what their usages are. We also implemented session injector example in which we intercepted request and injected auth token to each request. We also implemented example to globally handling the overlay on page while requests are in process.
Please write your feedback and suggestions in comments.
With AngularJS you create Single Page Application (SPA) which means you have only one page of your application and dynamically you change the content of that page. So it means that there is only one time rendering of your main Html after that you can switch or append the views without re-rendering.
As you have one page for your complete application, but you need the different page title property for each of your page. For example : home, about us, contact us, services etc. So you need a mechanism so your page title automatically get updated when you route to any page.
Lets see how can we achieve this with angularJs.
First thing you need to make sure for the implementation is that your ng-app="AppName" directive should be on html tag as title tag is in head section and to make it in application scope so you can update it within angularJS application you need to make it accessible from application.
<html ng-app="app">
   <head>
     Website Name
...
Now title tag is expecting title property in scope and since we need this common property in all of the controllers also title tag to be in that controller scope but instead of adding this property to all controllers we move this to rootScope and as rootScope is accessible from all over the application (under the ng-app="" scope) that's why we added ng-app directive to html tag.
Here we set the title property to all the routing object so now each route know the page's title property they are redirecting to.
//here we need to inject ui.router as we using it for routing
var myDemoApp = angular.module('myDemoApp', ['ui.router']);

//$stateprovider is the service procided by ui.router
myDemoApp.config(['$stateProvider', function ($stateProvider) {

//create route object

    var home= {
        url: '/home',
        templateUrl: 'views/Home.html',
        controller: 'HomeCtrl',
        title: 'home'
    },
    aboutUs= {
        url: '/aboutus',
        templateUrl: 'views/AboutUs.html',
        controller: 'AboutUsCtrl',
        title: 'About Us'
    },
    contactUs= {
        url: '/contactus',
        templateUrl: 'views/ContactUs.html',
        controller: 'ContactUsCtrl',
        title: 'Contact Us'
    };

//Now add these route state privider

    $stateProvider
       .state('home', home)
       .state('aboutus', aboutUs)
       .state('contactUs', contactUs);
}]);
Now each rout has attached the title property with, we need to access this property and set it in $rootScope so our title tag can have access on it.
Now we going to set this property form route configuration object to $rootScope service within each controller and for this we need to have access on state object in controller. Here we will use $state service of ui.router that will make state object available in controller.
angular.module('myApp')
    .controller('myController', ['$rootScope', '$state', function ($rootScope, $state) {

        //set property to rootscope
        $rootScope.title = $state.current.title;

}]);
Similarly each controller will set this property to $state.current.title or custom text which will be render in title tag.
Another easy way to achieve this is to assign it to rootScope on module run. This one time binding will set it to title property in rootScope and each route will update this accordingly.
Here is the code to set it on module run:
angular.module("myApp").run(function ($rootScope, $state, $stateParams) {

     //set it here
     $rootScope.title = $state.current.title;

});
So this is the easy way to set your title property dynamically. If you have any question or feedback regarding this post please post in comments.
If you are working on web application have checkbox input on your page then you might need to check whether the checkbox is currently checked or not for applying some condition. There are many ways to check that is checkbox is checked or not.
Lets firstly see the pure JavaScript ways to check the property. In JavaScript after selecting the particular element you can easily check with checked property.
Lets see a demo, there is checkbox in your page with some unique Id i.e, myCheckBox in following case.
<input type="checkbox" id="myCheckBox"/>
Now in JavaScript you firstly select the element and then get its checked property.
document.getElementById('myCheckBox').checked;
firstly we selected element by Id then we checked the property it will return true in case if check box is checked.
If you are working with jQuery and don't want to use pure JavaScript for this check then you have multiple ways to check this property:
using is(':checked')
You can use the function is() of jQuery to perform this action, what this function do is its check the selected element or set of elements for a condition you passed as argument and returns true if condition satisfied else false.
So to use is() firstly we need to select element than check for :checked selector which works for checkboxes, radio-buttons, and select elements.
Prior to jQuery 1.6 function attr() was used to get the property and attributes both according to element but it was confusing so after jQuery 1.6 new functio prop() was introduced to check the current property value of element.
Here firstly we need to know the difference between properties and attributes, Attributes are values we set in Html like we set the input textbox value to some initial text so you have set the attribute value but once page is loaded in browser and you changed the text of textbox. Here the difference will be visible on this moment attribute will still be the same you have provided in html while property will be updated with the updated value of textbox.
Here is textbox with attribute set with default text:
So lets say you have set checked attribute in html so on first time loading your checkbox get checked by default. So now attr() will always return the `checked` for $('#myCheckBox').attr('checked') as it was provided in html(or updated later but not the current state). So you need to check it with prop() which will provide always the updated value.
Here is example using prop()
$('#myCheckBox').prop('checked');
Here is Demo which also show the fixed value provided by attr() if we set it in html.
using filter :checked
Another way to check the property is to use filter :checked in selector and then check for the length of elements. It is not recommended way and give you wrong output in case if you are working with class instead of id and there are more than one input radio button, checkbox or select elements on same page.
var isChecked = $('#myCheckBox:checked').length > 0;
So we have seen multiple ways of checking the checked property of checkbox. This is the thing which web developers usually have to use and cause of confusion in some scenario to select the correct way to use it.
Please give your feedback and suggestions for the articles in comments.
Today I came to know an interesting case of Date object in JavaScript, I decided to share with my readers. DateTime object is always problematic for developers, specially in Web project where you need to handle different time zones.
JavaScript has the core class of Date, which has many useful date function. As JavaScript is client-side language and it runs on clients browser so it creates the Date object of clients local time-zone, so you don't need to handle localization for client but when you get this value on server than you need to change it to UTC (or as per business requirements). You can easily create current date-time object using:
var dateTimeNow = new Date();
or you can pass the date fields to constructor:
var dateTime = new Date(year, month, day, hours, minutes, seconds, milliseconds);
Date class has many useful and handy function which allow you to manipulate Date object and perform different operations. You can get day, month, year, hour from date object or you can convert it to UTC date object. Similarly you can change day, month, year or time of an object.
var dt = new Date();
dt.setFullYear(2014);
dt.setMonth(9);
dt.setDate(11);
One important thing in JavaScript Date object every developer should know is its month start from zero so:
dt.setMonth(0);   //set January
dt.setMonth(1);   //set February
dt.setMonth(2);   //set march
dt.setMonth(3);   //set April
dt.setMonth(4);   //set May
dt.setMonth(5);   //set June
So What will happen if you set 12 to this date object?
If you are thinking it will give you an error then you are wrong because it won't. What actually JavaScript date object will do is it will consider January of next year on setting the 12. So it sometime may cause error or unexpected result which might confuse developer if they are unaware of behavior.
var dt = new Date();
dt.setFullYear(2014);
dt.setMonth(12);
dt.setDate(1);

alert(dt.toString()) //alert January 2015
The inconsistent and confusing behavior I found for which I am writing this article is, setting Date to a date object.
If you set last date to a JavaScript date object in such a way that that date i.e, 31st for April, June, September, November or 30th ,31st for February. It will change the month.
For instance today is 20th of April 2014, and you coded to set 31st of October in way that you set the date first before changing month, Now if you are expecting Date object of 31st October than JavaScript is not your friend here as it will change the date object to October 1st 2014.
See code:
var dt = new Date(2014,3,20);  // 20th April 2014
dt.setDate(31);       //will change to 1st of May
dt.setMonth(9);       //1st October 2014

alert(dt.toString()) //alert 1st October 2014